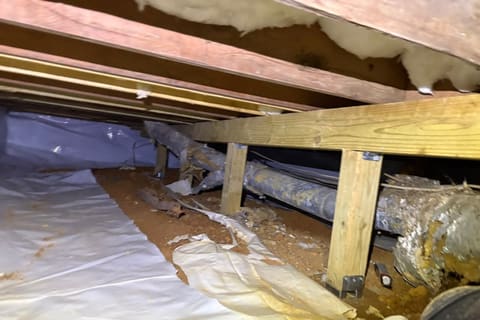
The DIY vapor barrier mistakes we see most under Atlanta houses: laying plastic over an unsolved water problem, buying thin sheeting that tears on the first crawl, leaving seams loose, stopping coverage short of the foundation walls, and sealing the space with no plan for summer humidity. Any one of these can waste your Saturday and your plastic. The first one is the expensive one, because the new barrier hides the rot while it spreads.
I crawl under these houses for a living, so what follows is not theory. It's what I keep finding.
What affects whether a DIY vapor barrier holds up
| Factor | Why it matters under an Atlanta house | If you get it wrong |
|---|---|---|
| Drainage and standing water | Our red clay drains slowly, and spring rains push water under low crawlspaces | Plastic traps moisture against the joists and hides the damage |
| Plastic thickness | Thin sheeting rips on clay clods, old brick, and every trip a plumber makes | Punctures and tears within a season or two |
| Seam overlap and taping | Ground moisture finds every gap | Vapor bypasses the barrier and the musty smell stays |
| Where the plastic ends at the wall | Georgia termite inspectors need exposed block at the top of the wall | A voided termite bond, or an infestation nobody can see |
| Humidity control | Atlanta dew points sit high from June into September | Condensation on ducts and framing even with plastic down |
| Existing wood damage | Plastic covers the evidence | Soft joists and band boards keep getting worse out of sight |
Mistake 1: laying plastic over a water problem
Last April I was under a 1948 brick ranch off Columbia Drive in Decatur. The owner had put down new plastic the previous fall, and honestly it was a tidy job, seams taped and everything. There was an inch of water sitting on top of it. The plastic wasn't the problem or the solution; the crawlspace needed an interior French drain and a sump pump before any sheeting mattered.
A vapor barrier controls moisture that evaporates up out of the soil. It does nothing about liquid water coming in at the footing, and in a lot of intown neighborhoods with clay soil and old shallow foundations, that's the actual issue. If you see standing water, mud that never dries, or water staining on the block after a hard rain, solve drainage first. Plastic over a wet crawlspace is a lid on a pot.
Mistake 2: thin plastic from the big box store
The 4-mil and 6-mil rolls on the shelf are fine for painting drop cloths. Under a house, they tear the first time you drag yourself across them, and the second time the cable guy does. Georgia red clay dries into hard, sharp clods, and most older Atlanta crawlspaces still have construction debris, old brick, and root stubs scattered around.
For a ground cover that survives, you want reinforced sheeting in the 10 to 12 mil range. It costs more per roll, and it's the difference between a barrier and confetti in three years.
Mistake 3: loose seams and untaped penetrations
Moisture vapor doesn't need much of an opening. A barrier with 2-inch overlaps and no tape is closer to a suggestion than a seal. Overlap seams by at least 12 inches, tape them with actual seam tape rather than duct tape, and cut the plastic tight around every support column and plumbing penetration, then tape those collars too. Duct tape lets go in crawlspace humidity within months.
This is the fussy, uncomfortable part of the job, which is exactly why it gets skipped. It's also most of what separates a barrier that works from one that just changes the color of the dirt.
Mistake 4: running plastic all the way up the wall
This one surprises people, because it feels thorough. In Georgia, your termite company needs a few inches of exposed foundation wall at the top so they can inspect for mud tubes. Run the plastic up to the sill and you can void your termite bond, and worse, you give termites a hidden highway into the framing.
Turn the plastic up the wall a short distance if your approach calls for it, but leave an inspection gap of about 3 inches below the wood. We repair termite-damaged joists and band boards regularly, and the treatment side always stays with the customer's pest control company. Nearly every one of those repair jobs involved damage that stayed invisible longer than it should have.
Mistake 5: sealing it up with no plan for humidity
Some DIYers go further than a ground cover: foam board in the vents, plastic everywhere, crawlspace closed. In Atlanta that's a half-measure that can backfire. From June into September our outdoor dew point regularly beats the temperature of your ductwork and floor framing. Close the vents without conditioning the air and you've built a terrarium. Condensation shows up on duct boots and joist bottoms, and the musty smell you were chasing gets worse.
A sealed crawlspace works, but it works as a system: sealed ground cover, sealed walls with the inspection gap, and a drained, properly sized dehumidifier keeping relative humidity under about 55 percent. Plastic alone doesn't get you there.
When DIY makes sense, and when it doesn't
If your crawlspace stays dry year-round, has decent clearance, and the old plastic is just tired, replacing the ground cover yourself is a fair weekend project. Buy the heavy sheeting, overlap generously, tape everything, and leave the termite gap.
It stops being a DIY job when the plastic would be covering a problem. Standing water needs drainage work. A bouncy or sloping floor needs the framing looked at, sometimes with sistered joists or a drop girder on interior steel columns. Fungal growth on the joists needs to be addressed before anything gets sealed over it. Those are the jobs our crawlspace services crew handles every week, and an inspection costs you a phone call and an hour, not a ruined Saturday under the house.
If you've already got plastic down and something still smells musty, that's usually the house telling you the barrier wasn't the whole answer. Have someone crawl it before you buy another roll.